Huntercoin: Mithril Edition - Getting Started
TODO - Work In Progress
Overview
INSTRUCTIONS: Read and perform the steps on this page, then continue on with the links at the bottom of the page. And make certain to read the "Hot Tips!" They are a MUST! (Really - you need to read it.)
INFO: There are many missing features. This is a preview. They are coming... Because we love HUC fans!
"Huntercoin: Mithril Edition" is a Huntercoin client that lets you play Huntercoin without the huntercoin-qt.exe program. It provides a much smoother, easier game flow with advanced features to assist you in finding coins, hunting hunters, and avoiding being hunted!
Requirements:
- Microsoft Windows
- .Net Framework 4.0 (at least client profile)
Download Microsoft .NET Framework 4 Client Profile - Microsoft XNA Framework Redistributable 4.0 Refresh
Microsoft XNA Framework Redistributable 4.0 Refresh - Official Huntercoin unzipped to a folder (contains huntercoind.exe - the Huntertcoin daemon)
http://huntercoin.org/downloads/ (You should have last version).
Check last version on huntercoin official forum
In the future, it could be shipped with the client itself
Installing XNA
Visit the following URL to download the proper XNA framework:
https://www.microsoft.com/en-au/download/details.aspx?id=27598
Once downloaded, double-click the MSI file to install XNA and follow the directions. You may need to reboot your computer.
Getting the Most Recent Huntercoin Daemon
Visit the official Huntercoin download page here:
http://huntercoin.org/downloads/
To use Huntercoin: Mitril Edition, you do not need to run the Huntercoin QT client, but you do need to link Huntercoin: Mitril Edition to the huntercoind.exe (the Huntercoin daemon).
Once downloaded, simply unzip the file into a new folder.
Getting Huntercoin: Mitril Edition
To get Huntercoin: Mitril Edition, visit the download section of this site
TOKEN
Once downloaded, unzip it into a new folder.
You're now ready to sync the blockchain, then start playing.
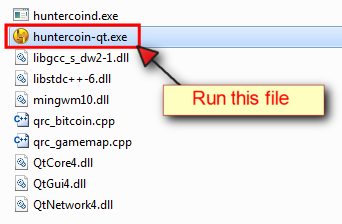
Starting Huntercoin: Mithril Edition the First Time
After unzipping the content in a folder, open the folder and run the file HuntercoinMithrilEdition.exe

Once the client loads, you must enter a few settings in the settings screen.
Press the ESC key to display the settings.
Settings
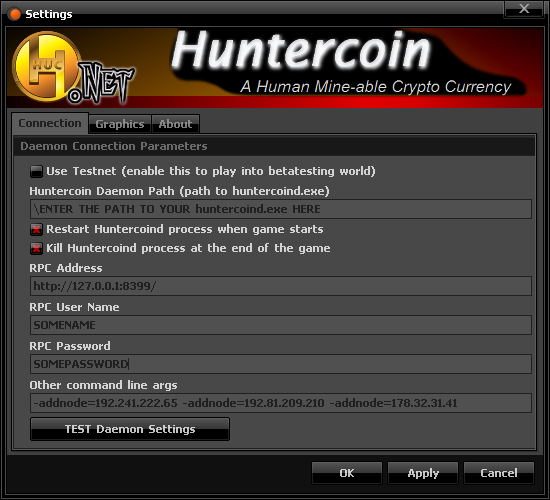
Now, enter the proper settings as detailed below.
1) Uncheck "Use Testnet".
2) Enter the path to the huntercoind.exe file. This is what you downloaded from the official Huntercoin web site (http://huntercoin.org/). It should look something like this:
C:\Users\YOUR WINDOWS LOGIN\Downloads\Huntercoin\huntercoind.exe
It won't look exactly like that, but will be similar.
3) Check "Restart Huntercoind process when game starts".
4) Check "Kill Huntercoind process at the end of the game".
5) Enter your RPC Address as "http://127.0.0.1:8399/". "127.0.0.1" is the local loopback, which means your computer, and 8399 is the port that Huntercoin uses.
6) Choose a username and password with no spaces. It doesn't matter what they are. You can let people know these as they aren't real secrets (unless you're running some special services, which you won't be if you're playing Huntercoin).
STEPS 7 TO 11 ARE OPTIONAL FOR ADVANCED USERS. IF YOU DO NOT KNOW WHAT YOU ARE DOING, IGNORE THESE.
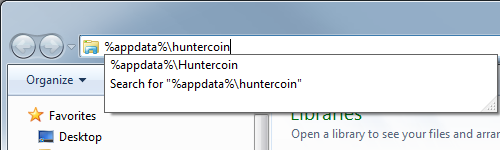
7) Run the Huntercoin QT client that is in the same folder from step #2 above. After it loads, close it. This will create the Huntercoin appdata folder.
8) Open Windows Explorer and enter "%appdata%\huntercoin" into the address bar. This will browse to the folder that you just created in step #7 above.
9) Create a file named huntercoin.conf
10) Open "huntercoin.conf" in a text editor, e.g. Notepad, Editplus, Notepad++, etc. DO NOT USE MS WORD OR WORDPAD!
11) Enter the following into the text editor
addnode=192.241.222.65
addnode=192.81.209.210
addnode=178.32.31.41
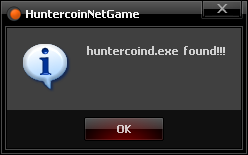
12) Click the "Test DAEMON Settings" button. You should receive this message if you entered the path properly:
13) If you want to play in full screen mode, click the Graphics tab, check "Fullscreen Mode", then choose the appropriate resolution for your monitor and click "Test".

DONE! Your settings are all finished. Click "Apply" or "OK", and confirm saving the settings.
Now, restart the program!
Syncing the Blockchain
After you’ve entered the settings and restarted Huntercoin: Mithril Edition, the program will start the Huntercoin daemon and begin to sync the blockchain. If this is the first time that you’ve sync’d the blockchain, it could take a while, depending on your Internet connection speed. (On slow connections, expect it to take a day.)
The only thing you need at this point, is some patience. If you’ve ever downloaded a large MMORPG before, this is actually much faster.
At first, you will see a “Starting” and “Waiting” message like this:
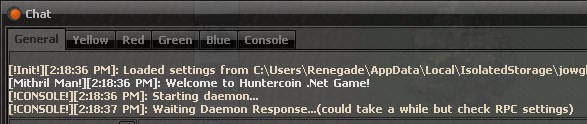
“Waiting” will continue for a little while, and usually around 1~3 minutes.
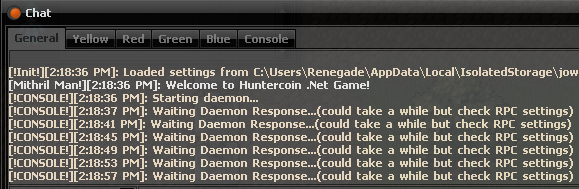
Go get yourself a cup of tea.
When you get back from getting a drink, the program should be synchronizing the blockchain for you. This is the lengthy part, and depends on your Internet connection speed.
You will see several messages:
- Game CONNECTED TO Huntercoin DAEMON, Hurray!!!!
- Trying to (re)syng from block ####
- Out of Sync, block #### is ## days, ## hours ## minutes old, keep syncing
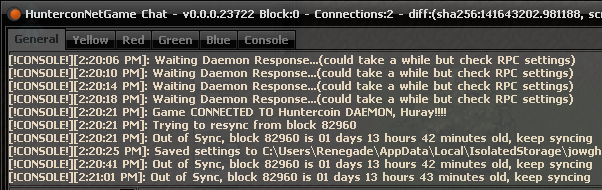
The ## days and hours that you see isn’t the time that you need to wait. Huntercoin is a real time game, so that’s just an indication of how far out of sync you are. On a fast connection, “1 day” of blocks should synchronize in a couple minutes or so.
You may see an “[!ERROR!][TIME]: System: The operation has timed out” message. This isn’t a problem as the game will continue to sync the blockchain. If you really like the updates, you can safely restart the program. The amount that you’ve already downloaded is already on your computer and won’t be lost. (See below.)
And when it’s finished, you’ll also see “New Game State Loaded, height:####”.
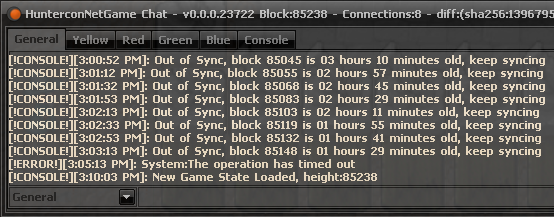
The “height” is the blockchain height, and is a measure of what “turn” the game is on at the moment.
But… what you’re really been waiting for has finally arrived!
THE BLOCKCHAIN IS NOW SYNC’D AND YOU’RE READY TO PLAY!
(The preview edition is “read-only”, so you can only “see” the game, but can’t play it. It is still very useful for getting some in-game intelligence about enemy movements as you will see.)
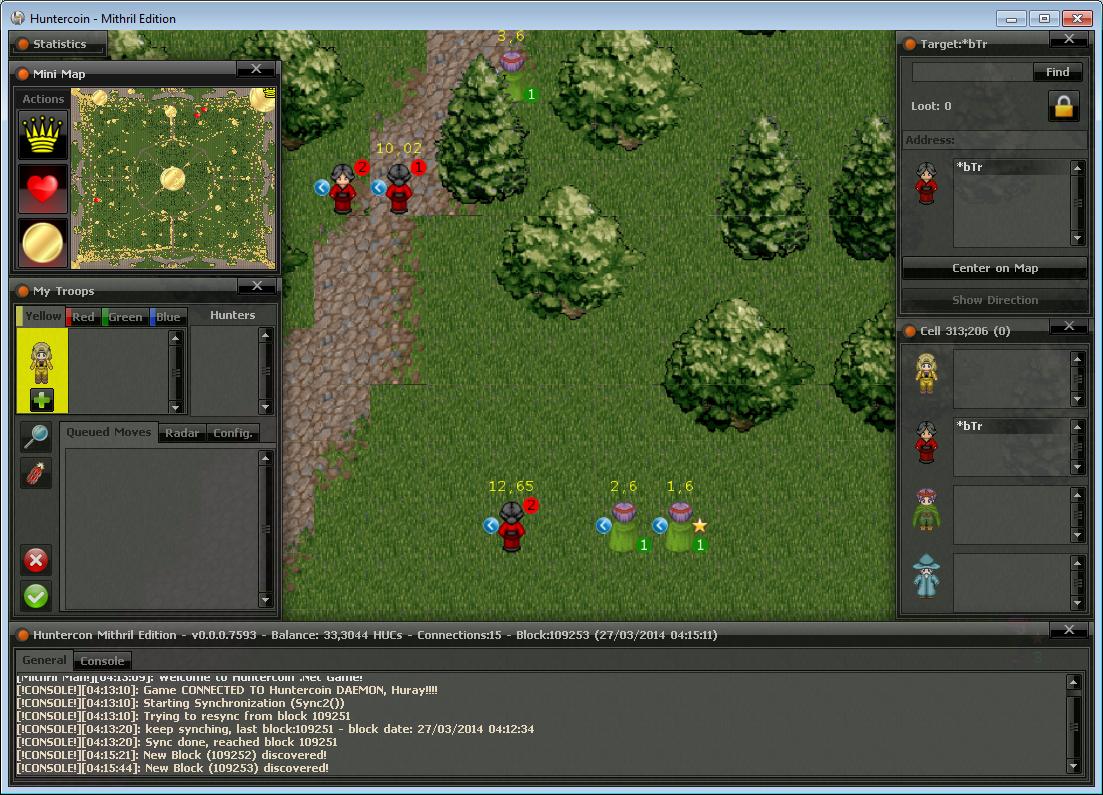
Client Interface
Huntercoin: Mithril Edition, has many floating windows that help the player have full control over the game
Windows gives the player more insight about what's happening in the game world, and allow the player to use advanced features to help him gather coins around the map (that's the main goal of the game!)
Let's see in details what these windows can offer
Mini Map

The mini map lets you zoom in and out and pan around the map in a small area. It is useful for monitoring different locations, tracking the crown, finding hearts, and finding coins.

Click the crown to instantly find the crown on the mini map and follow it.
Cick it again to stop following the crown.

Click the heart to toggle heart visibility on the map.
Hearts give you extra hunters. They’re rare, so if you have a chance to get one, get it!
Click the coin to toggle coin visibility on the map.
These are the real prizes in the game. Collect as many as you can.Double-click anywhere in the mini map to instantly navigate on the main map to that location.
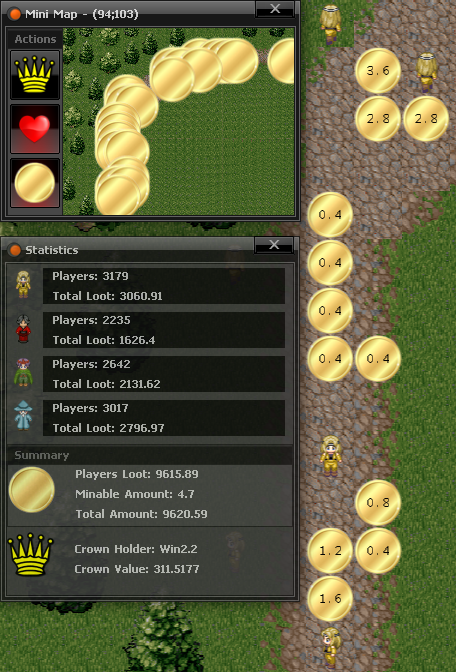
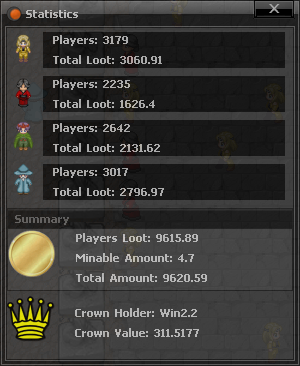
Statistics
The statistics window gives you quick information about how many hunter generals there are (players/teams), and how much loot they have.
It also tells you the total amount of loot that all players have, the amount that you can mine on the map, the name of the player that has the Crown of Fortune, and how many coins they have.
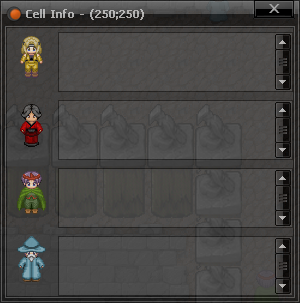
Cell Info
Cell Info tells you about the specific square you have clicked on. If there are no hunters on the square, it is empty.
If there are hunters in that square, like here:

Then you will see all of their names and how many coins they have:
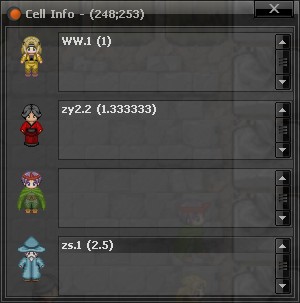
Click on a name to make it your “target”.
If you’ve closed the Cell Info window, you can easily open it up by double-clicking on any square. The Cell Info window will be restored along with information on that square.
Target
Selecting a hunter in the Cell Info window makes that hunter’s team your current “target”.
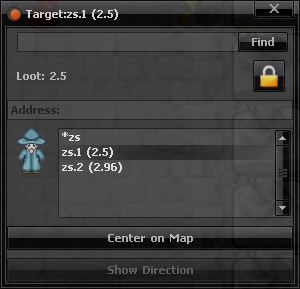
Double-click on a hunter, or click “Center on Map” to quickly navigate on the map to where that hunter is.
If “Show Direction” is not greyed out, click it to toggle the hunter’s path so that you know where he is going. Paths are even numbered so that you can see how many blocks it will take for that hunter to reach a particular square on the map. <– This is a killer feature that will help you play much better! (Especially against bots!)

Enemy paths are drawn in cyan (light blue). (Your paths are drawn in red.)
The “Find” input lets you enter the name of any hunter to quickly locate them on a map.

To track a hunter, click the lock button. Your cell selection will follow that hunter.

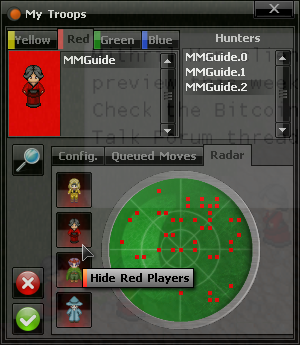
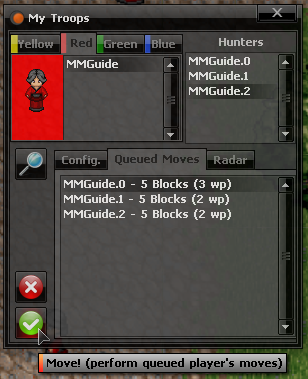
My Troops (moving not available in read-only preview)
The “My Troops” window is where you control your hunters.
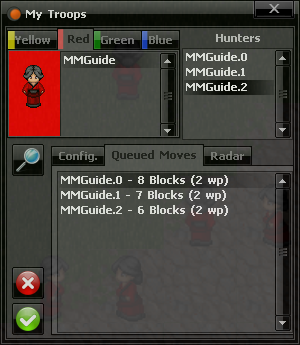
Click on a colored tab to select the color of your team that you want to control.
In the first panel, select the name of the team. In the second panel, select the specific hunter that you want to control. Double-click on a hunter to center the map on that hunter.
Right-click on the square you want to move to. You can see the path that your hunter will take, along with the number of turns it will take to get to each point along the way.

The blue highlighted square is your currently selected hunter. The yellow highlighted square is your last selected square.
Your paths are drawn in red, unlike enemies that are drawn in cyan.
As you can see, in game chats appear in word bubbles, so you can quickly and easily find out who is talking. And hunt them down if you like…
Click the green checkmark to move. (Unavailable in preview.)
The radar screen shows all the different colors around your team. You can click the hunter icons to hide colors as well.